In the name of God
my-command
Cheatsheets
Terminal
- Show tabular file in terminal
column -s, -t < your_file.csv | less -#2 -N -S
-sseparate by (,)tshow as a tablelessto better display
Compile C
gcc -o caesar caesar.c -lcs50
Get all branch of repository
git fetch --all && git pull origin '*:*'
Install the download package
sudo dpkg -i package.deb
Display or Check SHA256 checksum
Display and check hash of a file or text
SHA256
- display hash of a sample text "Hello, world"
echo Hello, world| sha256sum
OR
printf Hello, world | sha256sum
- check hash of ubuntu downloaded
cd download_directory && sha256sum ubuntu-9.10-dvd-i386.iso
KECCAK-256 (SHA-3)
printf Hello, world | openssl dgst -sha-256sum
Google Colab
- use from file in google colab
from google.colab import drive
drive.mount('/content/drive/')
Tmux
| Activation | Command |
|---|---|
| Zoomin window | Ctrl + b z |
| Zoomout window | Ctrl + b z |
| Vertical division window | Ctrl + b % |
| Horizontal division window | Ctrl + b " |
| Close a window | Ctrl + b x |
| Close all windows (close tmux) | Ctrl + b & |
| Resize winddows | Ctrl + b ⭠ ⭡ ⭣ ⭢ |
| Show Time | Ctrl + b t |
| Number of windows | Ctrl + b q |
Zellij
| Activation | Command |
|---|---|
| Zoomout window | Ctrl + b + z |
| Vertical division window | Ctrl + b + % |
| Horizontal division window | Ctrl + b + " |
| Close a window | Ctrl + p + x |
| Switching bitween windows | Ctrl + b + ⭠ ⭡ ⭣ ⭢ |
| Switching bitween windows | Alt + ⭠ ⭡ ⭣ ⭢ |
| Resizing window | Ctrl + n + ⭠ ⭡ ⭣ ⭢ |
| Rename window | Ctrl + p + c |
| Manager | Ctrl + o + w |
| Change Horizontal/Vertical windows | Ctrl + Space |
| Floating window | Alt + f |
| Resize window | |
| New Tab | Ctrl + b + c |
| Move a pane to another tab | select pane Ctrl + t + [] |
Vim
| Description | Command | Description |
|---|---|---|
| Copy mode | Ctrl + v |
|
| Copy | " + + + y |
|
| Pase | " + + + p |
|
| Write on the previuse line | Shift + o |
for open a line before |
| Write on the next line | o |
for open a line after |
| Append | Shift + a |
for append text in end line |
| Append | a |
for append text after next character |
| Delete word | d + w |
for delete word |
| Delete line | d + $ |
for delete line |
| Delete line (cut) | d + d |
for delet line (all) |
| Move word | w |
for move on the beginning of words |
| Move word | b |
Backward to start of current/previous word |
| Move word | e |
for move on the ends of words |
| Start line | 0 |
for move on the beginning of lines |
| End line | $ |
for move on the ends lines |
| Delete multi word | 5 + d + w |
for delete 5 words |
| Undo | u |
for undo one by one |
| Undo | Shift + u |
for undo |
| Redo | Ctrl + r |
for redo |
| Replace | r |
for replace a letter |
| Correct | ce or cw or c$ or ... |
ce:Correct and replace untile end of word. c$: Correct from the word until end of the line. |
| Show file info | Ctrl + g |
Show file name, lines and ... |
| End of the file | Shift + g |
go to end file |
| Start of the file | g + g |
go to start file |
| Go to line n | n + Shift + g |
Go to line n (n is a natural number) |
| Search | / |
For search in forwqrd |
| Search | ? |
for search in backward |
| Next | n |
next finded |
| Previous | Shift + n |
previous finded |
| Find maches | % |
find maches parantesis or brocets or ... |
- Substitude
:[range]s/pattern/replacement/[flags]
- [range]
%-> All content10, 20-> Line 10-20
- pattern -> RegEx
- replacement -> text
-
[flags]
g-> All selected by patternc-> Accept for each replace (confirm)
-
for example: replace foo inestead of bar on all content
vim:%s/bar/foo/g
Vim spell checker
- Simple
:set spell
- Spelling spacial language
set spelllang=en
- Persian language spelling
set spelllang=fa
- Shortcut to navigate to misspellings
| Shortcut | Description |
|---|---|
| [s | Go to next misspelled |
| ]s | Go to previous misspelled word |
| z= | Show alternative suggestions |
| zg | Add word to personal directory |
| zw | Mark word as misspelled |
Customize vim
Git
git clone <repo-url>
  cd <repo>
  git fetch --all
  for branch in $(git branch -r | grep -v '\->');do git branch --track "${branch#origin/}" "$branch"; done
- To push all branches
git push --all origin
OR
git push origin branch1 branch2 branch3 ...
- To commit on the latest commit
git add .
git commit --amend --no-edit
- Show graphically git log
git log --all --decorate --online --graph
- Get spesific branch from repo
git clone --branch=main https://github.com/username/repo.git
- Get spesific commits from repo (for example 01 last commit)
git clone --depth 10 https://github.com/username/repo.git
- Local clone repository (from this path to another path locally)
git clone repo_path
- Show changes by HEAD commit
git diff
OR
git diff HEAD
- Show changes from the last commit with 5 commits before the HEAD
git diff HEAD~5
- Show changes from the last commit with 5 commits befor the HEAD for spacial files
git diff HEAD~5 file
-
Git log
-
Simple log
bashgit log -
One line
bashgit log --oneline
-
Show graphicaly log
bashgit log --graph --oneline
-
Git stash
-
Save current changes to a specific (accessible) location and go to the last commit (tracted files)
bashgit add . git stash
-
Save current changes to stash (tracted & untracted files)
bashgit stash -u
-
Save current changes to stash (tracted & untracted & ignored [all] files)
bashgit stash -a
-
Show stash
bashgit stash show
-
Reverting stash changes (by stash number)
bashgit stash pop stash@{0}
-
Git Blame
Information about each line of a file
git blame file
-
Git Tag (readable name instead of hash name)
-
Create tag for this commit
bashgit tag "tag_name"
-
Assigning a tag to another commit based on hash name
bashgit tag "tag_name" 528a389
-
Git Reflog
git reflog
- Change last commit
git add file
git commit --amend -m "new commit message"
-
Git Clean
-
Flags
i: intractivef: forced: directoryn: filex: ignored files or directories
-
remove file in main path (untracted)
bashgit clean -n
-
remove directory in main path (untracted)
bashgit clean -d
-
Git Revert
git revert is a Git command that reverses the changes of a specific commit by creating a new commit whithout deleting the history.
git revert <commit-hash>
- Git Reset
git reset resets changes to a previous state ans can modify the commit history.
-
Type of
git reset- soft(
--soft): MovesHEADto a previous commit, keeping changes staged.
bashgit reset --soft <commit-hash>
- Mixed(
--mixed) -> default: ResetsHEADand the staging area but keeps working directory changes.
bashgit reset --mixed <commit-hash>
- Hard(
--hard): Deletes all changes from history, staging area, and working directory( irreversible!).
bashgit reset --hard <commit-hash>
- soft(
-
Git rm
git rm removes files from the working directory and staging area. (Use git commit to apply the changes permanently)
Usage
-
Remove a file and stage the deletition.
bashgit rm <file>
-
Remove from Git but keep it locally.
bashgit rm --cached <file>
-
Git Remote
-
SSH
- Generate ssh key
bashssh-keygen
Don't share
id_rsa**You can just share
id_rsa.pub- Add SSH in locally system
bashssh-add path/.ssh/id_rsa- If you encounter an error while adding SSH, run blow command and follow description.
bashssh-agent -sTo fun : show keys of a persen added to github or gitlab with bellow trick
https://github.com/username.keys
DON'T SAVE Public keys from a person because you give him access to the system.
-
Show remote
bashgit remote -
Set remote
bashgit remote add origin git@github.com:username/repo.git
-
Git Push
-
Push changes after seting up the remote when repository doesn't have this branch (Set up strem)
bashgit push -u origin new_branch
-
Git Checkout
-
Create Branch
bashgit checkout -b branch_name
-
Change branch
bashgit chekout branch
-
Git Rebase
-
An interactive way to modify commit history, allowing you to edit, reoeder, squash, or delet commits.
Command Short Command Description pickpKeep the commit unchanged in history(default). rewordrAllows you to modify the commit messge. editePauses the rebase process so you can modify the commit (1.g., edit files of add changes). squashsMerge this commit with the previous commit message unchanged. fixupfSimilar to squash, but it keeps the previous commit message unchanged.dropdRemoves the commit from history. execxRuns a shell command during the rebase process. bashgit rebase -i HEAD~n
-
Git Merge
-
Merge two branch (branch1 with main)
bashgit checkout main git merge branch1
-
Git Branch
-
Create branch
bashgit switch -C branch_name
OR
bashgit checkout -b branch_name
-
To check status of the commits
bashgit branch --verbose
-
Show list of branches
bashgit branch -
Remeove branch
bashgit branch -d branch_name
-
Git Cherry Pick
-
cherry-pick: Select specific commit from another branch and applies them to the current branch.bashgit cherry-pick <commit-hash>
Linux
- To show information of sytem
wis the shortest linux command.
w
whois similar towcommand but shorter.
-
Use
Ctrl + rto search in the history of last commands. -
To find current path
pwd
- To mount external hard
sudo mount -t ntfs-3g /dev/sdb2 /mnt
- Exteract
example.zipin to example/
unzip example.zip -d example
- find file
find [parent-path] -type [type] -iname "name"
find /home -type f -iname "file-*.txt"
-
cat & tac
-
cat: show file from beginning to end.-n-> number lines-b-> number lines none block-A-> end lines-s-> remove white enter
-
tac: show file from end to beginning. -
Change Python version
-
if call python run python2
bashsudo ln -sf /user/bin/python2 /user/bin/python
-
Changing user with root access
vim /etc/sudoers
user host=(user) command
-
go to line
#Allow root to run any commands anywhereand added ...bashuser ALL=(ALL) ALL
-
The user can onlychange their password (passwd command)
bashuser ALL=(ALL) /bin/passwd
Ubuntu
- Move to monitors
Super + Shift + ⭠ ⭡ ⭣ ⭢
- Move window
Alt + F7 + ⭠ ⭡ ⭣ ⭢ + Enter
- Change size
Alt + F8 + ⭠ ⭡ ⭣ ⭢ + Enter
SSH
-
get IP config -> (int 127.23.21.11)
must be install
sudo apt install net-toolsbashifconfig
-
ssh to phone (android)
bashssh u0_aXXX@192.168.X.X -p 8022
SSH-KEYGEN
- generate ssh-kegen
ssh-keygen
- Introducing another system's IP and saving it in the current system
sudo vim /etc/hosts
append ip to hosts file
192.168.X.X other-sys
- easy ssh
ssh u0_aXXX@other-sys
SCP (secure copy)
- copy file
test.txtfrom other sytem to this system (by recursive)
scp -r u0_aXXX@other-sys:test.txt .
User Management
Users
- Adding new user
sudo useradd <username>
- Set password to new user
sudo passwd <username>
- Go to new user
su - <username>
- Logout from user
exit
- Delete user
ps -u <username>
sudo kill -9 <PID>
sudo pkill -u <username>
sudo killall -u <username>
sudo userdel -r <username>
- User defaults
useradd -D
GROUP=100
HOME=/home
INACTIVE=-1
EXPIRE=
SHELL=/bin/sh
SKEL=/etc/skel
CREATE_MAIL_SPOOL=no
LOG_INIT=yes
- Show and edit default useradd config
sudo vim /etc/default/useradd
- Show and edit default configs
sudo vim /etc/login.defs
Groups
- Show all groups
groups
- Add new groups
sudo groupadd <group_name>
- Changing the group of user
sudo usermod -G <new-group> <username>
- Append the user to the supplemental GROUS
sudo usermod -aG <new-group> <username>
- Removing group from user
sudo groupdel <group-name>
Login
- Show logins
loginctl
- Change Age (change time of stay in system)
chage <username>
Can change:
Minimum Password Age [0]:
Maximum Password Age [99999]:
Last Password Change (YYYY-MM-DD) [2025-04-30]:
Password Expiration Warning [7]:
Password Inactive [-1]:
Acount Expiration Date (YYYY-MM-DD) [-1]:
Password Manager
- Unlocking the password of an user
sudo passwd -uf <username>
- Locking the password af an user
sudo passwd -l <username>
- Changing the password with stdin
echo "password" | passwd --stdin <username>
Permission Management
- Show status of permission of files
ls -l
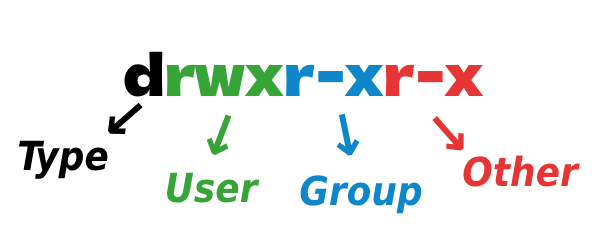
- File and Ownership Permissions Structure
Every file and directory in Linux have three kinds of owers:
- User (u): The creator of the file becomes its owner. You can change the ownership later.
- Group (g): Users are part of specific groups.Managing users in a multi-user environment involves creating separate groups(e.g., dev team, QA Team, sysadmin team). Group membership simplifies permission management.
- Other (o): This group includes all users on the system, even if you're the sole user. Everyone with access to the system belongs to this group.
- All (a): All kinds (i.e., User (u), Group (g), and Other (o))
Each file and directory have three permissions for all three owner types:
-
Files | Mode | Abbrevation | Absolute Mode | Description | | --- | --- | --- | --- | | Read | r | 4 | Allow viewing or copying file contents. | | Write | w | 2 | Permits modifying file content. | | Execution | x | 1 | Enablesrunning executable files (scripts or programs). |
-
Directory
Mode Abbrevation Absolute Mode Description Read r 4 List files and copies them from the directory. Write w 2 Adds or deletes files (requires execute permission). Execution x 1 Allows entering the directory.
File Permissions have two modes. An absoute mode and symbolic mode. The modes detail the type of enteries required for permissions to take effect.
-
Symbolic Mode
-
Symbolic mode allows you to modify permissions based on their current state.
-
+: Adds permissions.
- -: Removes permissions.
- =: Sets permissions explicitly.
-
-
Absolute Mode
- In absolute mode, you explicitly specify the permissions using numeric value (octal notation). These values represent the combination of read, write, and execute permissions for the owner, group, and others.
Numeric Value Mode Description 0 --- No permissions 1 --x Execute only 2 -w- Write only 3 -wx Write and execute 4 r-- Read only 5 r-x Read and execute 6 rw- Read and write 7 rwx Read, write, and execute -
File Types
Character File Type How to Create Description - Regular file Any program that writes a file Common files like text, code, and binaries b Block special file mknodStorage devises like disks c Character scecial file mknodDevices that read/write character data (e.g., keyboard) d Directory mkdirA folder containing files and subdirectories l Symbolic link ln -sA reference to another file or directory p Named pipe mkfifoFIFO queue for inter-process communication s Socket nc -UNetwork communication between processes D Door Created by some servers Specific to Solaris/OpenIndiana systems -
Permission Placement
- Type
- User
- Group
- Other
chmod ugo+rwx
chmod 770 <file/directory-name>
chmod 770=>user: 7 = 4 + 2 + 1
group: 7 = 4 + 2 + 1
other: 0 = None
-> rwxrwx---
Ownership
- Change onwnership (e.g., change onwnership of a directory to root )
chown root <directory-name>
- Change group (e.g., change group of a directory)
chgrp <group-name> <directory-name>
- Change ownership and group for a directory
chown <ownership-name>:<group-name> <directory-name>
Spacial Permissions
| Numeric Value | Mode | Description |
|---|---|---|
| 4XXX | SUID (Set User ID) | Executes the file with the owner's privileges instead of the user's. |
| 2XXX | SGID (Set Group ID) | Executes the file with the group's privileges or inhereits the directory's group. |
| 1XXX | Stick Bit | Prevents users from deleting file they don't own in shared directories. |
-
SUID (4XXX): Runs the file eith the owner's permissions (e.g.,
passwd). -
Set:
bashchmod u+s <file>
OR
bashchmod 4755 <file>
-
Display:
rwsr-xr-x -
SGID (2XXX): Runs the file with the group's permission; new files in directories inherit the group.
-
Set:
bashchmod g+s <dir>
OR
bashshmod 2755 <dir>
-
Display (file/dir):
rwxr-sr-x -
Sticky Bit (1XXX): Restricts file delting in shared directories (
/temp). -
Set:
bashchmod +t <dir>
OR
bashchmod 1777 <dir>
-
Display:
rwxrwxrwt -
Examples
| Permission | Command | Effect |
|---|---|---|
-rwsr-xr-x |
chmod 4755 <file> |
Enables SUID |
-rwxr-sr-x |
chmod 2755 <file> |
Enables SGID |
drwsrwsr-x |
chmod 4775 <file> |
Enables SGID on a directory |
drwxrwxrwt |
chmod 1777 <file> |
Enables Sricky Bit |
Umask (User Mask)
umask defines the default permissions for newly created files and directories by subtractingits value from the maximum possible permissions.
-
Default Behavior:
-
Files: Maximum permission is 666 (
rw-rw-rw-), but they never get execute (x) by default. -
Directories: Maximum permission is 777 (
rwxrwxrwx). -
Example:
If umask is 022:
- Files:
666 - 022 = 644→rw-r--r-- -
Directories:
777 - 022 = 755→rwxr-xr-x -
Check & Set umask:
-
Check current umask:
bashumask -
Set umask (e.g.,
027):bashumask 027
- Files →
640(rw-r-----) - Directories →
750(rwxr-x---)
- Files →
To make changes persistent, add
umaskto~/.bashrcor/etc/profile.
Partitioning
- Show parthtion for GPT
gdisk /dev/sda
- Show partition for MBR
fdisk /dev/sda
- Show partition graphicaly
cfdisk /dev/sda
- Show partition graphicaly for GPT
cgdisk /dev/sda
Mount & Unmount
- Mount
sdb1on the/mnt
mount /dev/sdb1 /mnt/
- Show open process in
/mnt
lsof /mnt/
- Unmaount
/mnt
umount /mnt
Network Management
- IP Address
ip a
OR
ip addr
- Show opening ports
nmap <host-name>
Time Management
- show date
date
- Show and setting information of system time
timedatectl
- Change timezone
timedatectl set-timezone Asia/Tehran
Process Management
- Show jobs
jobs
- Run process in background
<app-name> &
OR
<app-name>
^Z
bg
- Show processes
htop
- top settings
With
spacekey you can deactivate option
top
f
Install Arch Linux
- Install dependencies
pacman -Syyy
- Install reflector package for find near mirror
pacman -S reflector
Hint: If get an error, use
pacman-key --init
- Find and update nearest mirror list
| Flags | Argument | Description |
|---|---|---|
-c |
country name | Country name |
-a |
age | last update of mirror |
--sort |
rate | Sorting by rate |
--save |
file path | Save mirrors to use from its |
reflector -c Iran -a 6 --sort rate --save /etc/pacman.d/mirrorlist
- Partitioning
cfdisk /dev/sda
- Select gpt
- Create space 300M (300MiB)
- Select type EFI System
- New space for root with type Linux filesystem
- New space for home with type Linux filesystem
- New space for swap with type Linux swap
- Write partitioning and yes and Quit
-
Check partitioning
zshlsblk
-
Making file system
-
Making
bootdrivezshmkfs.fat -F /dev/sda1
-
Making
rootdrivezshmkfs.ext4 /dev/sda2 -
Making
homedrivezshmkfs.ext4 /dev/sda3 -
Making
swapdrivezshmkswap /dev/sda4 -
Mounting
-
Mounting swap
zshswapon /dev/sda4 -
Mounting
/dev/sda2in/mnt(root)zshmount /dev/sda2 /mnt
- Making the directories for
/home&/boot
zshmkdir /mnt/home /mnt/boot
- Making the directories for
-
Mounting
/dev/sda1in/mnt/boot(boot)zshmount /dev/sda1 /mnt/boot
-
Mounting
/dev/sda3in/mnt/home(home)zshmount /dev/sda3 /mnt/home
-
Install requirements software
-
ّInstall dependencies in
/mntpathzshpacstrap /mnt base linux linux-firmware vim tmux
-
Generate file system table
-
This command extracts the mounted partitions in
/mntusing their UUIDsand writes the info to/mnt/etc/fstab, so the installed system can properly identify and mount them at boot--even if their device names change.
genfstab -U /mnt >> /mnt/etc/fstab
-
Switching to Arch Linux
-
The command switches into the installed system at
/mnt, allowing you to configure it as if you had booted directly into it.zsharch-chroot /mnt -
Select timezone
ln -sf /usr/share/Zoneinfo/Asia/Tehran /etc/localtime
hwclock --systohc
-
Select system language
-
Select and set language
zshvim /etc/locale.genUncommenting the
en_US.UTF-8 UTF-8and saving an exit -
Generate language
zshlocale-gen
-
Configuration
zshecho "LANG=en_US.UTF-8" >> /etc/locale.conf
-
Create hostname for system
echo "My-Hostname" > /etc/hostname
echo "127.0.0.1    localhost
::1        localhost
127.0.1.1    ArchLinux.localdomain ArchLinux" >> /etc/hosts
- Create password for root
passwd
- Update system and packages
pacman -Syyy
pacman -Syu
- Install requires packages
pacman -S grub efibootmgr networkmanager network-manager-applet dialog wpa_supplicant mtools dosfstools base-devel linux-headers xdg-user-dirs xdg-utils nfs-utils bluez bluez-utils pipewire pipewire-alsa pipewire-pluse pipewire-jack bash-completion openssh reflector os-prober tmux vim htop
- Install grub
grub-install --target=x86_64-efi --efi-directory=/boot --bootloader-id=GRUB
grub-mkconfig -o /boot/grub/grub.cfg
- Enables required packages
systemctl enable NetworkManager
systemctl enable bluetooth
systemctl enable reflector.timer
-
Adding user
-
Add user
zshuseradd -m <username>
-
Add password for user
zshpasswd <username> -
Add user to
wheelgroupzshusermod -aG wheel <username>
-
Add user privilege specification
zsh## ## User privilage specification ##
root ALL=(ALL:ALL) ALL <username> ALL=(ALL:ALL) ALL
-
Exit
zshexit -
Umount and reboot system
zshumount -a reboot -
Install graphical environment
-
Install KDE
zshsudo timedatectl set-ntp true
zshsudo hwclock --systohc
zshsudo pacman -Syyy
zshsudo reflector -c Iran -a 6 --sort rate --save /etc/pacman.d/mirrorlist
zshsudo pacman -S xorg sddn plasma kde-applications firefox chromium
zshsudo rebootzshsudo pacman -S xf86-video-vmware
zshsudo reboot -
Install GNOME
zshsudo pacman -S gnome gnome-extra gnome-tweaks
zshsudo pacman -S archlinux-wallpaper
Emmet (HTML-CSS)
HTML
-
Command:
a:www.google.com - Description: Add
hrefto the<a>tag. -
Result:
html<a href="www.google.com"></a>
-
Command:
a[https://google.com] - Description: Add
hrefto the<a>tag. -
Result:
html<a href="https://google.com"></a>
-
Command:
ul<li{example text $}*5 - Description: Add content to multiple
<li>tags and repeat them. -
Result:
html<ul> <li>example text $</li> <li>example text $</li> <li>example text $</li> <li>example text $</li> <li>example text $</li> </ul>
-
Command:
ul>li#item$@-43*5 - Description: Inverse the number from 43, and create 5
<li>elements with the inverted number as part of the content. -
Result:
html<ul> <li id="item-43">item-43</li> <li id="item-42">item-42</li> <li id="item-41">item-41</li> <li id="item-40">item-40</li> <li id="item-39">item-39</li> </ul>
-
Command:
table>(thead>tr>th{col$}*4) + (tbody>tr*3>td{row$-$}*4) - Description: Create a table with automatic content, including a header and body rows with numbered columns and rows.
- Result:
html
<table>
  <thead>
    <tr>
      <th>col1</th>
      <th>col2</th>
      <th>col3</th>
      <th>col4</th>
    </tr>
  </thead>
  <tbody>
    <tr>
      <td>row1-1</td>
      <td>row1-2</td>
      <td>row1-3</td>
      <td>row1-4</td>
    </tr>
    <tr>
      <td>row2-1</td>
      <td>row2-2</td>
      <td>row2-3</td>
      <td>row2-4</td>
    </tr>
    <tr>
      <td>row3-1</td>
      <td>row3-2</td>
      <td>row3-3</td>
      <td>row3-4</td>
    </tr>
  </tbody>
</table>
Text
- head
View the first 15 lines of the file
bashhead -n 15 file.txt
- tail
View the last 15 lines of the file
bashtail -n 15 file.txt
- cat
Show files with line numbers
bashcat -n file.txt
-
grep
-
Filter file after line 190 by "ali"
bashgrep -A 190 ali file.txt
OR
bashtail -n 40 file.txt | grep ali
-
Filter file before line 190 by "ali"
bashgrep -B ali file.txt
-
To don't show phrase(for example: filter by ali but does include hadi)
bashgrep ali | grep -v hadi
-
To recursive filter
bashgrep -r .py ~/Desktop
-
egrep
For RegEx
-
find exactly a and 2 l
bashegrep 'al{2}' file.txt
-
find a and minimum 2 l
bashegrep 'al{2,}' file.txt
-
find a and maximum 2 l
bashegrep 'al{,2}' file.txt
-
diff
-
differente lines in 2 simailar files
bashdiff file1.txt file2.txt
-
cut
remove sections from each lines of files
-
Processing stdout
ls -lhand get field 5 and 10 and saving into fileinfo.txtbashls -lh | cut --delimiter=" " -f 5,10 > fileinfo.txt
-
tr
translate or delete characters
-
lowercase to uppercase (freq -> FREQ)
bashecho 'freq' | tr [:lower:] [:upper:]
Phone
- get username
bashwhoami
- get IP
pkg install net-toolsbashifconfig
- run ssh in phone
bashsshd
- set password
bashpasswd
AND
bashchmode 600 ~/.ssh/authorized_keys
- close ssh
bashexit
Z-shell
- git alias z-shell
grafical logzshgloga
Bash
>: write>>: append<: (stdin)
bashsort < file.txt
|: pipe (stdin)
bashcat file.txt | sort
- (stdin)
bashsort file.txt0: stdin1: stdout-
2: stderr -
Bash completion
-
if bash completion is disable
bashsudo vim /etc/inputrc
chane
disable-completion ontodisable-completion offor delete this line.bashset disable-completion off
-
variables
-
show variables
bashenv
-
show variables
bashecho $PWD
-
define temporary variable
bashexport MYVAR=/home/path
-
define permanently variable
bashvim ~/.bashrcAdding variables permanently
bash# export SYSTEMD_PAGER= export MYVARFILE=/home/path
apply changes
bashsource ~/.bashrc
- define alias
bashvim ~/.bashrcadding alias command
bash# User specific aliases and function alias mydir="cd $MYVAR; ls -aF"
- bash history
show all commands
bashvim ~/.bash_historyrun commands from history (for example run command 6)
bash!6
clear history
bashhistory -c history -w
- bash logout
write stdout of a command or function log when logout bash (for example)
append stdout of
ls -lcommand intonew_logfilebashvim ~/.bash_logoutbash# ~/.bash_logout ls -l >> new_log
- bash profile
similar to bashrc
Bash Scripting
- shebang
sh#!/bin/bash- bash scripting check writeable
bashls -l-
if not writeable
bashchmode +x bash_script.sh
-
run bash script
bash./bash_script.sh
-
comparison operator
-
eq: equal gt: greater thange: greater equallt: less thanle: less equal
Comment line in bash scripting
- Single line
sh# line- Multi line
sh: " line1 line2 line3 ... end line "
- Printf formatting
Specifier Description %% Prints "%" symbol %c Takes arguments as a single character %e & %E Take argument in floating-point number and prints in exponential notation, %e for lower case letter and %E for capital letter %g & %G Take argument in floating-point number and prints in normal or exponential notation %f Takes argument as floting number %d Takes arguments as signed integers %u Takes arguments as unsigned integers %o Takes argument as an unsigned octal number %x & %X Takes arguments as unsigned hexadecimal integers Get Input
- Get input number and store on VAR
shecho -n "enter number: " read VAR
- Get string input
shecho "enter name: " read name
Condition
shif [[ condition ]] then commands elif [[ condition ]] then commands else commands fi
For Loop
- Structure
shfor var in item1 item2 item3 do commands done
- For in the range
shfor num in {start..end..step} do commands done
Brake Loop
- Continue
shfor i in {1..5};do if [[ $i == 2 ]];then continue fi echo "Number: $i" done
- Break
shfor i in {1..5};do if [[ $i == 2 ]];then break fi echo "Number: $i" done
While Loop
- Structure
shi=0 while [ Loop break condition ] do commands (( i++ )) done
- Infinite Loop
shwhile : do commands loop_break_condition done
Read File
shfile=path/file while read -r line do echo $line done
Arguments
- Get Arguments
shargs=("$@") echo ${args[0]} ${args[1]}
- All Arguments
shecho $@
- Number of Arguments
shecho $#
Array
- Make Array
sharray=("item1" "item2" "item3" "item4")
- Getting the data from array
Use
@to get all elementsUse
!to get index of elementsUse
#to get the number of elementsshecho "${array[@]}" echo "${!array[@]}" echo "${#array[@]}"
Function
- Structure
shfunction_name() { commands } function_name
- Return value
shfunc_name() { echo "value" return 12 } func_name
output
bashvalue
Use $? to get numeric returned vale
shfunc_name() { echo "value" return 12 } func_name echo $?
output
bashvalue 12
- Get value from function
shfunc_name() { local var="Linux" echo $var } variable="$(func_name)" echo "$variable"
- Send argumanet to function
shfunc() { echo "hello, $1" } func "name"
- Use argv as function argument
shfunc() { echo "hello, $1" } func $1
output
bashapp_name.sh ali hello, ali
Database
Mongo DB
- Install MongoDB
- Start
bashsudo systemctl start mongod
- Enable
bashsudo systemctl enable mongod
- Run & Test
bashmongosh
- Exit
mongodbexit
- Show all database
mongodbshow dbs
- Create or Connect Database
mongodbuse my_database
- Create Collecation
mongodbdb.createCollection("collection_name")- Show Collections
mongodbshow collections
- Current Database
mongodbdb
- Remove Database
mongodbdb.dropDatabase()
- Remove Collection
mongodbdb.collection_name.drop()
- Add Data to collection
mongodbdb.collection_name.insert({ name: 'ali', age: 23, salary: 5000 })- Show all documents of a collection
mongodbdb.collection_name.find({})OR
mongodbdb.collection_name.find({}).pretty()- Show all documents in a collecation that contain condition
mongodbdb.collection_name.find({name: "value"})- Show one field in all document from collecation
mongodbdb.collection_name.find({condition}, age:1, _id:0)- Show document with limited results
mongodbdb.collection_name.find({}).limit(4)- Show documents and ignored numbers of first result
mongodbdb.collection_name.find({}).skip(2)-
Show documents with multi conditions
-
AND
mongodbdb.collection_name.find({age: 25, nmae: "ali"}) -
OR
mongodbdb.collection_name.find($or[{age: 30}, {name: "mahdi"}]) -
Greater Than or Less Than
$gt-> greater than$lt-> less than$gte-> greater than equal$lte-> less than equal$ne-> not equal
mongodbdb.collection_name.find({age: {$gt: 15}}) -
Update document
mongodbdb.collection_name.update({condition}, {$set:{age: 43}})- Remove Objects contains similar values
mongodbdb.collection_name.remove({column:value})- Remove spacial objects
mongodbdb.collection_name.remove({_id: ObjectId("shaID")})Jupyter Notebook
- Write and create file by jupyter
ipynb%%writefile file.txt this is first line from content to write into the file this is second line for writing into file. ... this is last line to write into the file.
Python
- Precendence & Associativity of Arithmetic Operators
Periority Operators Associativity 1 () Left to Right 2 ** Right to Left 3 +x and -x Left to Right 4 *, /, //, and % Left to Right 5 + and - Left to Right -
Tips
- The output of division in Python is decimal number.
py30 / 2
>>> 15.0- Write large numbers in Python for convenience with underescores
py1_000_000_000 >>> 1000000000
-
Get and remove last value from list
pylst = ["Ali", "Mohammad", "Mahdi"] name1 = lst.pop() print(name1) >>> Mahdi print(name1 is lst) >>> False print(lst) >>> ['Ali', 'Mohammad']
- Infinite Loop
pywhile True: if 2 < 3: print("runing") break
OR
pywhile 1: if 2 < 3: print("runing") break
Numpy
- Get All rows and columns from a matrix
pyimport numpy as np arr = np.array([ [1, 2, 3], [4, 5, 6], [7, 8, 9] ]) print(arr[...]) >>> array([[1, 2, 3], [4, 5, 6], [7, 8, 9]])
Windows
-
Write text into a file by
CMDHINT: UseCtrl + zto end writing and copying into the file.
batcopy con file.txt This is my text for copying to file. this is seconde line for copying to file. ... ... ... this is a last line to copeing into file. ^Z
- Read content a file in
CMD
batcopy file.txt conoutput
batThis is my text for copying to file. this is seconde line for copying to file. ... ... ... this is a last line to copeing into file.
- Delet file by
CMD
batdel file.txt -